-1.png)
Causes and Solutions for Embroidery Needle Breakage
2025-04-15How to Speed Up Embroidery Production - Tips for Increasing Efficiency
2025-04-29
EMBROIDERY TIPS
Accurate Positioning of Embroidery on Clothing
POSTED ON APRIL 23rd, 2025 BY BAi
Embroidery is beloved for its ability to add intricate details and personalized style to garments. Whether it’s adding a touch to a simple T-shirt or enhancing the elegance of formal wear, the precise placement of embroidery is key to achieving a professional result. In this article, we will explore a range of effective methods to help you accurately position embroidery on clothing, ensuring precision and enhancing the overall aesthetic of your work.
Before diving into how to precisely position embroidery on your clothing, let’s look at some tools that can help with accurate placement.
Embroidery Positioning Tools
Marking Tools
- Water-Soluble Pen: Ideal for temporary marking of embroidery positions on fabric. Easily washed away with water after completion.
- Air-Soluble Pen: Marks disappear automatically after a period, suitable for projects completed in a short time.
- Chalk: Especially useful for dark fabrics, allowing for easy marking and erasure.
Templates and Rulers
- Embroidery Templates: Provide standardized patterns and positioning references, useful for repetitive designs.
- Rulers and Measuring Tapes: Used for precise measurement of embroidery positions to ensure symmetry and consistency.
Embroidery Hoops and Clamps
- Embroidery Hoop: Keeps the fabric taut and prevents shifting, ensuring the accuracy of the embroidery design.
- Clamps: Especially useful for larger fabric pieces or garment sections, securing the embroidery position.
These tools can be easily found in stores or online shopping platforms like Amazon. You can choose the ones that best suit your needs and preferences.
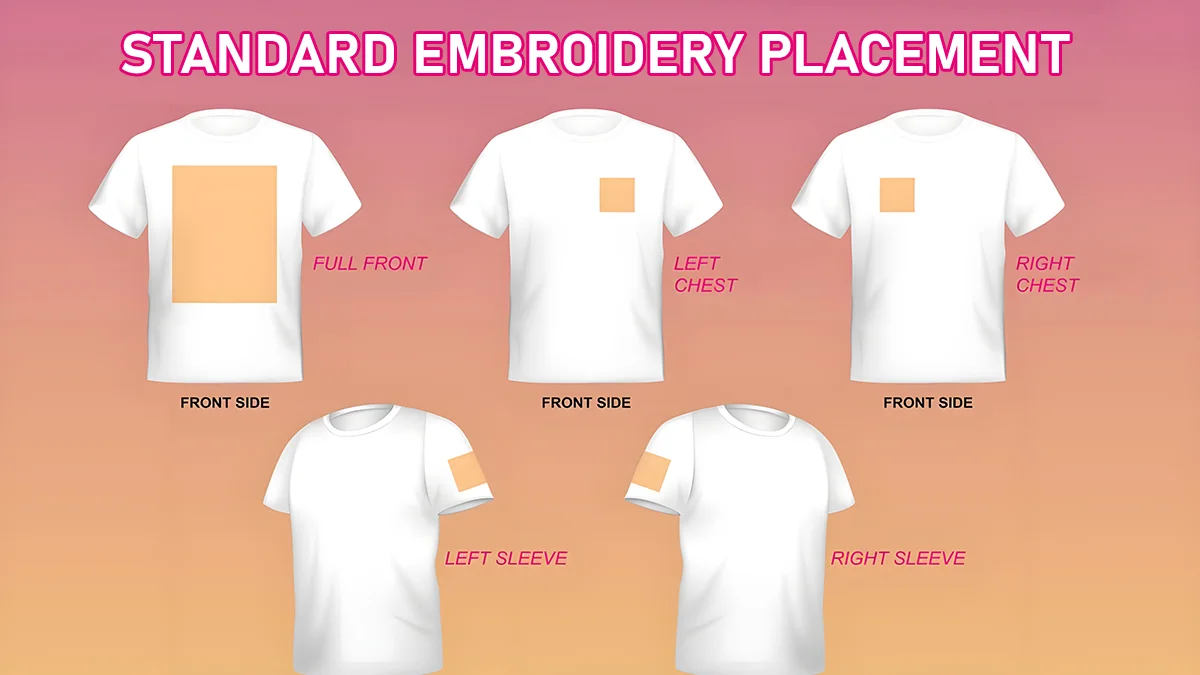
With these tools, you can accurately position embroidery to ensure that every stitch achieves the desired effect. Next, I will guide you on how to position embroidery on common locations on clothing.
Some shirts and short sleeves come with pockets, which can affect the embroidery outcome. Therefore, I will discuss the scenarios with and without pockets separately. Understanding these differences can help you achieve the best embroidery results on different types of garments.
Some shirts and short-sleeve tops come with pockets, which may affect the embroidery results, so I’ll discuss pocketed and non-pocketed garments separately. Understanding these differences can help you achieve the best embroidery outcome on various types of clothing.
Pocket-Perfect Shirts & Tees
Above the Pocket: A classic choice is placing the embroidery design just above the pocket. This integrates the embroidery visually with the pocket while not interfering with its function. Typically, the design is positioned about 0.5 inches above the pocket, aligned with the center of the buttonhole, and should not exceed 2 inches in height to avoid appearing too high.
Pocketless Shirts & Tees
For pocketless shirts or tees, embroidery placement is more flexible but requires attention to visual balance. Typically, designs are placed in the left chest area, where a pocket would be. Start about 3 inches below the neckline and center the design between the left shoulder seam and the centerline. The design size is usually under 3 inches (7.5 cm) to keep it balanced and clear.
Clothing typically comes in different sizes, so the embroidery placement needs to be adjusted accordingly. For women’s garments, the embroidery is usually placed 5-7 inches from the center, for men 6-9 inches, and for children 4-5 inches. These guidelines also apply to jackets, sweatshirts, and hoodies. However, these measurements are for reference only, and you can adjust the embroidery placement based on the specific size and design of the garment to ensure the best effect and appearance.
When creating garments with pockets, you may need to disregard the usual measuring methods, as placing the design directly over the pocket may not be suitable. Typically, you can position the design centered above the pocket, about 0.5 inches from the top of the pocket, and limit the design height to no more than 2 inches. This ensures that the embroidery does not appear too high or interfere with the pocket’s functionality, while maintaining overall aesthetics and balance.
Having discussed how to precisely position embroidery on the left and right chest areas, let's now share how to position embroidery on the chest.
The left or right chest area is commonly used for embroidery on various garments such as jackets, hoodies, and T-shirts. Since different garment styles and cuts affect the positioning, consider gender and clothing type when determining the embroidery location. Generally, embroidery is positioned 5-7 inches from the centerline for women and 6-9 inches for men, with children's or smaller garments possibly using 4-5 inches. Adjust these measurements based on the design size and garment cut for optimal visual results.
Center chest: a small area close to the chest
Central Chest: For designs placed at the center of the chest, use symmetry checks to ensure accuracy. Typically, the design is positioned about 3 inches from the collar's bottom and centered. The size range for embroidery is usually 6-10 inches in width and 2-10 inches in height, adjusted according to garment size. Common dimensions for adult garments are 8 inches wide by 4 inches high, and for youth sizes, 6 inches wide by 3 inches high.
Full front: from the chest to the stomach area
When embroidering across the front of the garment, use symmetry checks to ensure accurate placement. The design should be about 3 inches from the collar's bottom and centered on the garment. The embroidery size ranges from 10-12 inches wide, adjusted based on garment size. Recommended dimensions for adult garments are 11 inches wide by 11 inches high, and for youth sizes, 9 inches wide by 9 inches high. Avoid large designs on the chest area, especially with over 80,000 stitches, as it can make the area stiff and uncomfortable.
Although large-scale embroidery is technically feasible, I recommend avoiding extensive embroidery designs on the chest area, especially when the number of stitches exceeds 80,000. This is because overly dense embroidery can make the chest area very stiff, affecting wearing comfort.
In addition to determining embroidery placement using the methods mentioned above, you can also use specialized tools for positioning. Garments with different necklines often come with corresponding templates that help accurately position the embroidery design. Researchers and practitioners can purchase these templates from online platforms like Amazon to ensure precision and consistency in embroidery placement, which is particularly suitable for those engaged in mass production.
Cuffs (Left or Right): Approximately at the shoulder level.
In recent years, cuff embroidery has gained increasing attention. Compared to chest embroidery, cuff embroidery is more complex, primarily due to the use of embroidery hoops. The typical placement for cuff embroidery is about 1 inch above the top edge of the cuff seam and should be centered. For adult-sized garments, the recommended embroidery area is approximately 2.5 inches wide by 1 inch high, while for youth-sized garments, it is about 1.5 inches wide by 1 inch high. When positioning cuff embroidery, special care must be taken to align the design with the shoulder seam to ensure the symmetry and aesthetic appeal of the embroidery.
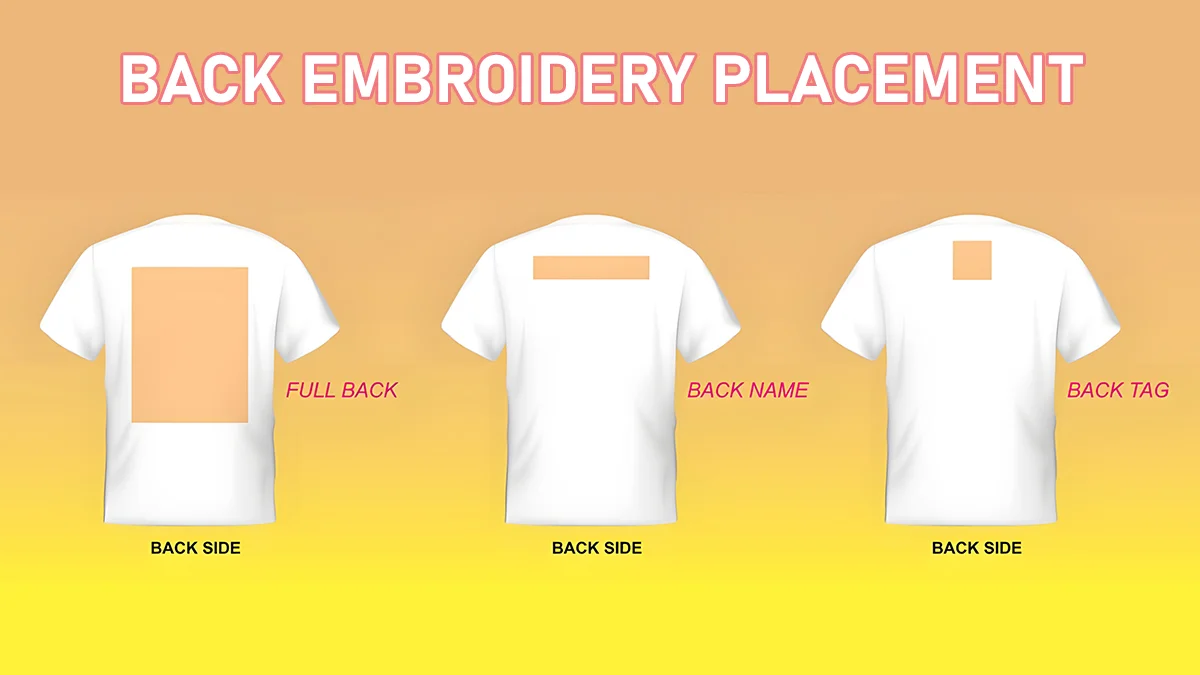
Upper Back: Extends from the shoulders down to the middle of the back.
When designing and creating embroidery patterns for clothing, the upper back area is often chosen as the ideal location for embroidery. Specifically, the embroidery is typically positioned about 4 inches below the collar. The size of the embroidery is adjusted according to the garment to ensure the pattern is visually appealing and structurally balanced.
For adult clothing, the recommended embroidery size is 12 inches wide by 4 inches high. This proportion provides a strong visual impact on the upper back while maintaining the overall design’s balance and aesthetics. For youth clothing, considering the differences in body size and garment dimensions, it is suggested to adjust the embroidery size to 10 inches wide by 2.5 inches high. This ensures that the decoration is effective without appearing disproportionate.
Back: Extending from the shoulders down to just above the abdomen.
In clothing design and manufacturing, back embroidery is a common and popular decorative technique. The embroidery on the back is typically larger in size, usually ranging from 11 to 13 inches wide and 13 to 15 inches high. This size is often used on men's clothing to emphasize a bold and solid style. However, for petite women's clothing, such large embroidery can appear too bulky and may not be well-balanced, so it's less frequently used.
Specifically, the placement of back embroidery is generally positioned about 4 inches down from the bottom of the neckline. This positioning ensures that the embroidery design is centered visually, neither too high to affect overall aesthetics nor too low to lose its decorative impact. For adult clothing, an ideal embroidery size is usually 12 inches wide by 14 inches high. This size allows the design to showcase intricate details while maintaining the overall balance of the garment. For youth clothing, considering the smaller body size, the embroidery is typically adjusted to 10 inches wide by 12 inches high. This adjustment retains the decorative effect while avoiding discomfort or an overwhelming appearance due to an oversized design.
By using these tools and techniques, you can precisely position embroidery on clothing, achieving a professional look and enhancing the overall quality of your work. I hope these tips help you manage your embroidery projects more effectively and create beautiful pieces.