-1.png)
Digitizing In House A Smarter Choice for Embroidery Shops than Outsourcing!
2025-04-08Accurate Positioning of Embroidery on Clothing
2025-04-23
EMBROIDERY TIPS
Causes and Solutions for Embroidery Needle Breakage
POSTED ON APRIL 15th, 2025 BY BAi
Using an embroidery machine often comes with unexpected issues, such as broken needles. Every time a needle breaks, the embroidery process must stop. To solve this frustrating problem, we need to understand the causes of needle breakage during embroidery and find practical solutions to ensure continuous operation and high-quality embroidery production.
This blog will cover the following aspects:
- What is needle breakage?
- What are the common causes and solutions for needle breakage?
- What measures can prevent needle breakage?
- What are some common issues related to thread breakage? (FAQ)
Let's dive in!
1. What is Needle Breakage?
Needle breakage refers to the sudden breakage or damage of the needle on the embroidery machine during the embroidery process. This can lead to embroidery stoppage and impact the quality of the embroidery work, as follows:
- Reduced production efficiency: Needle breakage causes the embroidery machine to stop, requiring adjustments and needle replacement, which delays production and lowers efficiency.
- Poor embroidery quality: Needle breakage can cause discontinuous embroidery lines and missing parts on the embroidery, affecting its completeness and appearance. Additionally, needle breakage may cause embroidery lines to deviate from their original paths, resulting in misaligned or shifted patterns, making the embroidery inaccurate.
- Increased costs: Needle breakage increases your workload and time costs. Replacing a needle only takes a few minutes, but it may take ten to dozens of minutes to troubleshoot the cause of the needle breakage and make adjustments.
2. What are the Common Causes and Solutions for Needle Breakage?
When needle breakage occurs, several factors might be responsible:
(1) Needle-related Issues:
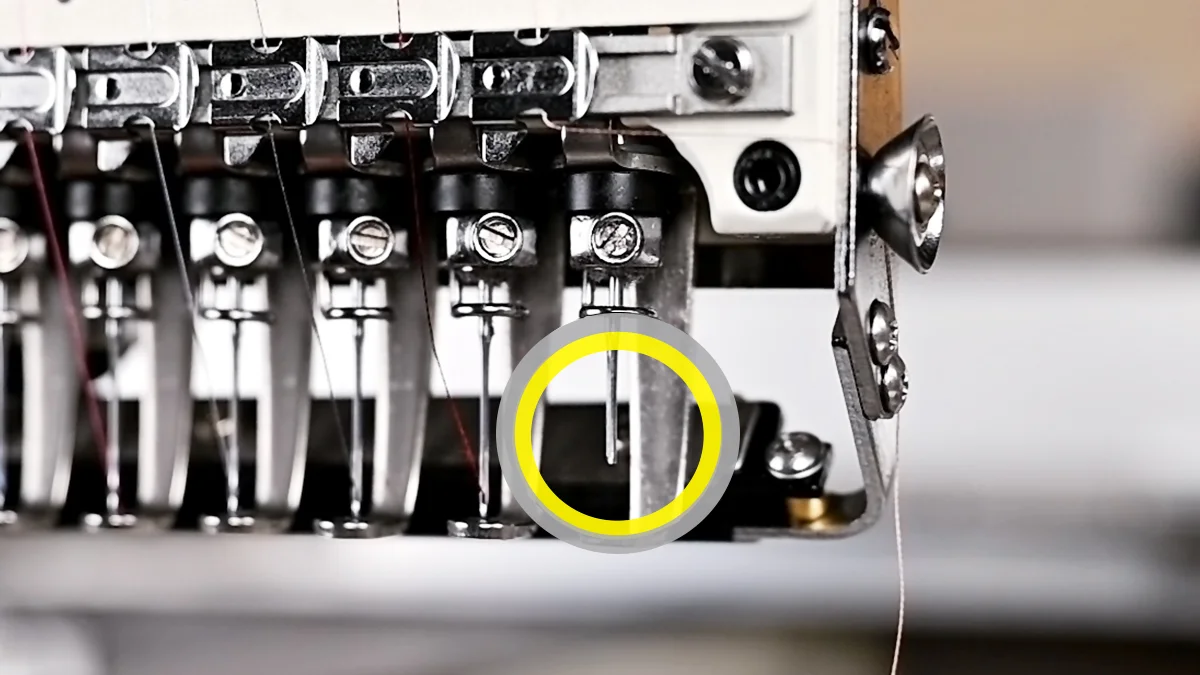
- Improper needle installation: Correct needle installation is crucial. If the needle is not installed correctly, it may rub against other parts, causing breakage.
- Solution: Ensure the needle is installed correctly as per the machine's manual, with the long groove facing forward and the short groove facing backward.
- Loose needle screw: The needle screw connects the needle to the machine, maintaining its stability. If it is loose, the needle may become unstable and misaligned, causing breakage.
- Solution: Tighten the needle screw using a hex screwdriver to ensure the needle is firmly fixed in place.
- Bent or blunt needle: After prolonged use, the needle may bend or become blunt, increasing friction with the fabric.
- Solution: Replace the needle if it is bent or blunt.
(2) Needle Plate-related Issues:
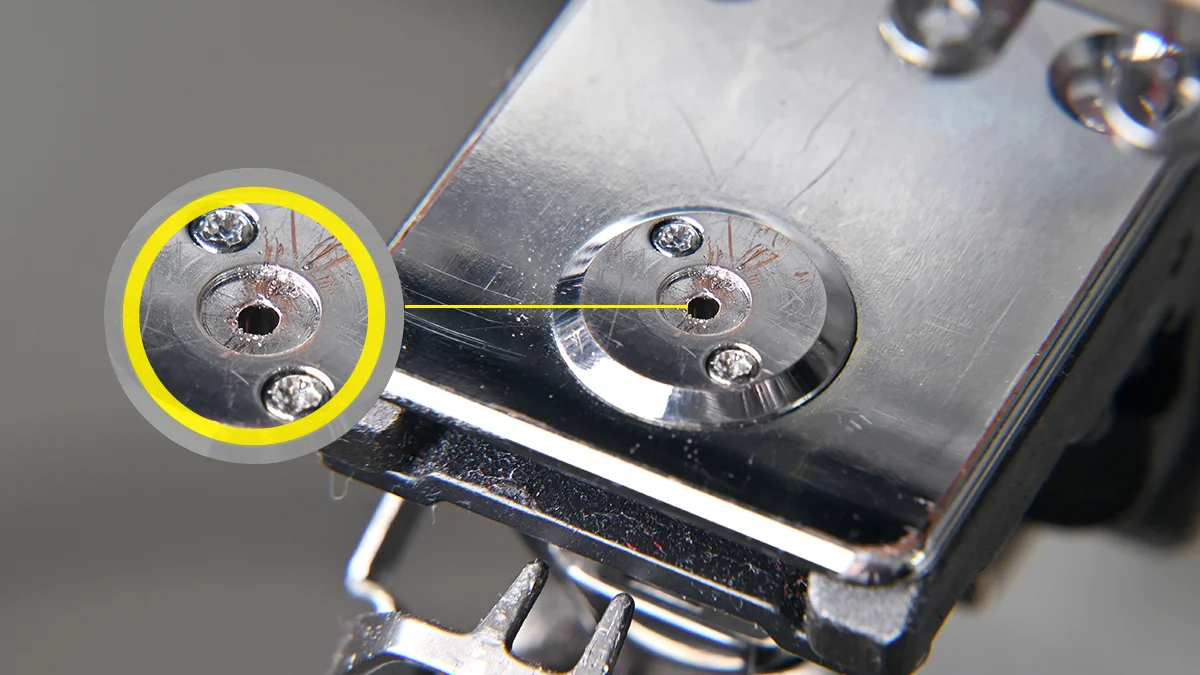
- Damaged area around the needle plate hole: The needle plate is located on the machine's bed, and the needle passes through its hole. If the area around the hole is damaged, the needle may get stuck or collide with the plate.
- Solution: Replace the damaged needle plate.
- Needle colliding with the needle plate: This could be due to incorrect needle plate installation, damage to the hole, or inaccurate needle setting.
- Solution: Correctly install the needle plate and adjust the needle position to avoid collisions.
(3) Embroidery Foot-related Issues:
- Damaged area around the embroidery foot hole: If the area around the embroidery foot hole is damaged, the foot may become unstable, causing needle breakage.
- Solution: Replace or repair the embroidery foot if damaged.
- Incorrect embroidery foot height or position: The height and position of the embroidery foot are critical for normal operation. If set too high or incorrectly positioned, the needle may collide with the foot.
- Solution: Adjust the height and ensure correct installation of the foot.
(4) Bobbin and Bobbin Case Issues:
- Incorrect installation: If the bobbin or bobbin case is not installed correctly, the thread may jam or fail to pass smoothly, leading to needle breakage.
- Solution: Reinstall the bobbin and bobbin case correctly, ensuring they are securely in place.
- Using incorrect bobbins: Different machines may require specific bobbins. Using unsuitable ones can disrupt thread flow and cause breakage.
- Solution: Use the recommended bobbins for your machine.
(5) Thread-related Issues:
- Improper threading: Incorrect threading can cause unstable tension or jamming, leading to needle breakage.
- Solution: Ensure the thread is correctly threaded and check for smooth movement by pulling it by hand.
- High thread tension: Excessive tension can break the thread or impede machine operation.
- Solution: Reduce thread tension and ensure the tension disc rotates freely when pulling the thread.
(6) Rotary Hook-related Issues:
- Incorrect hook timing: Improper hook timing can cause mismatched movements between the hook point and needle, leading to collisions and breakage.
- Solution: Adjust the distance between the hook point and needle until the timing is correct, typically 0.5mm at 202 degrees with a 0.1-0.3mm gap.
- Worn or damaged hook point: Prolonged use can wear or damage the hook point, increasing the risk of breakage.
- Solution: Replace the hook point to ensure smooth interaction with the needle.
(7) Other Issues:
- High stitch density: High-density designs can make stitching difficult, increasing the risk of breakage.
- Solution: Adjust the design to ensure smooth thread passage.
3. What Measures Can Prevent Needle Breakage?
To reduce the risk of needle breakage and improve embroidery quality, consider these measures:
- Use high-quality needles: Choose reliable needles that are strong, sharp, and undamaged. Select the appropriate needle size based on the fabric type and thickness.
- Regularly replace needles: Replace needles to ensure strength and longevity. The replacement frequency depends on usage, material hardness, and machine quality. Typically, replace needles after 5-30 hours of use based on your usage pattern.
- Use the correct embroidery thread: Choose threads suitable for the project and fabric, with adequate strength and softness.
- Adjust thread tension: Ensure appropriate thread tension. High tension increases the risk of breakage.
- Check and adjust designs: Review designs before stitching and make necessary adjustments to avoid overly dense or complex areas.
- Control embroidery speed: Moderate speed reduces friction and pressure on the needle.
- Regular machine maintenance: Clean and lubricate moving parts, and regularly check key components:
Needle: Ensure proper installation and check for damage.
Needle plate: Check for smooth holes without sharp edges.
Embroidery foot: Ensure correct height and clean condition.
Rotary hook: Check timing and inspect for wear or damage.
4. Common Issues Related to Needle Breakage (FAQ)
Q: What are the signs of needle breakage? A: Signs include thread breakage, skipped stitches, uneven stitching, and abnormal machine noises.
Q: What are the common types of needle breakage? A: Common types include:
- Straight break: Clean break due to high tension or improper threading.
- Bent break: Bent and broken needle due to improper threading or poor needle quality.
- Head break: Needle breaks into two pieces due to high tension or worn machine parts.
Q: Can I use bent or damaged needles? A: No, using bent or damaged needles can further damage the machine, cause additional breakage, or result in poor embroidery quality.
Q: Can I use needles that have fallen on the floor? A: No, even if they appear undamaged, they may have internal damage, leading to poor embroidery or breakage.
Q: How should I store embroidery needles? A: Store needles in a cool, dry place away from direct sunlight and moisture. Keep them in their original packaging or a protective box to prevent damage.
This concludes our blog on needle breakage. Thank you for reading, and we hope this helps you solve needle breakage issues. For further assistance, consult BAi's embroidery machine technicians for detailed inspections and adjustments.