-1.png)

BAi will be present at Impressions Expo Atlantic City 2025
2025-03-14Problems Related to Garment Fabrics During Embroidery
2025-03-21
EMBROIDERY TIPS
Embroidery Machine Thread Breaks: Causes and Solutions
POSTED ON MARCH 14th, 2025 BY BAi
Imagine this scenario: you're fully focused on your embroidery order when suddenly the thread breaks, forcing you to stop and make adjustments. It's frustrating, wastes time, and can even result in lower quality embroidery. But this situation is all too common, as thread breaks often occur during embroidery. Fortunately, in most cases, you can resolve this issue with a few simple steps. This article will introduce you to common causes of thread breaks in embroidery machines and provide solutions to help you tackle this challenge.
We'll cover the following topics:
- What are thread breaks?
- What are the common causes of thread breaks?
- What measures can you take to prevent thread breaks?
- What solutions can you implement when thread breaks occur?
- What are some common FAQs about thread breaks?
So let's dive in and learn how to overcome thread break issues in embroidery machines!
1. What are thread breaks?
In embroidery, "thread breaks" refer to the sudden separation of the embroidery thread being used during the embroidery process, resulting in the thread end disconnecting from the needle and making it impossible to continue stitching. Thread breaks can lead to the following issues:
- Discontinuous embroidery: When the thread breaks, the embroidery thread segment between the thread end and the needle disconnects, causing interruptions and discontinuities in the stitching lines, which affects the overall appearance and quality of the embroidery work.
- Difficulty in handling thread ends: When the thread breaks, the thread end may slip into the fabric, making it challenging to locate and handle, increasing the difficulty of repairing the embroidery work and potentially leading to thread nests.
- Impact on embroidery stability: Thread breaks disrupt the continuity and stability of the embroidery thread. If multiple thread breaks occur, the structure and strength of the embroidery work may be compromised.
- Increased time and workload: When a thread break happens, you need to stop, reorganize, and restart the embroidery. This increases the time and workload required for embroidery, prolonging the completion time.
In summary, thread breaks can interrupt the embroidery process and be accompanied by issues such as thread nests and misaligned stitches.
2. What are the common causes of thread breaks?
a) Excessive tension
The most common cause of thread breaks is improper tension. Typically, excessive tension makes the thread more prone to breaking.When the embroidery thread is subjected to excessive tension, it stretches beyond its strength limit and breaks. Just imagine holding a thin rope and suddenly pulling it with great force—it's likely to break in your hands. The same applies to embroidery thread.Moreover, when the tension is too high and the thread is overly stretched, it becomes taut and susceptible to pressure from uneven, rough, or sharp surfaces of the fabric. These objects exert additional pressure on the thread, leading to breaks at these rough spots.It's important to note that finer embroidery threads are more susceptible to breaking due to excessive tension. Fine threads are generally more fragile, with lower strength and stretching capabilities. Therefore, extra care should be taken to control tension when using fine threads for embroidery, avoiding excessive tightening.
b) Needle size too small
Using the wrong needle size in embroidery projects can cause excessive friction and tension on the thread, leading to breaks.If you use a needle that is too small, it may not provide enough space for the embroidery thread to pass through. When attempting to thread thicker embroidery thread through a small needle eye, the thread experiences excessive friction and tension. This excessive friction and tension exert additional pressure on the thread, surpassing its strength limit and causing it to break.Additionally, thread breaks can occur when the needle is not properly inserted into the machine, the needle is bent, the needle eye is rough or sharp, or the needle groove is too shallow.
c) Poor thread quality
The quality of embroidery thread is crucial for successful embroidery. If you use low-quality thread, you may encounter frequent thread breaks.Poor thread quality typically refers to insufficient thread strength or unstable thread construction. This means that the thread is more prone to breaking during the embroidery process.Insufficient thread strength may result from using cheap or low-quality materials. The fibers in such thread may not be strong enough and easily break under certain tension. Additionally, unstable thread construction refers to a lack of strong bonding between the fibers, leading to loose or breakable thread.Furthermore, the coating or coloring of the thread can also affect its quality. Low-quality coating or coloring may result in a rough or uneven surface of the thread, increasing friction on the fabric and causing breaks.
d) Machine component wear

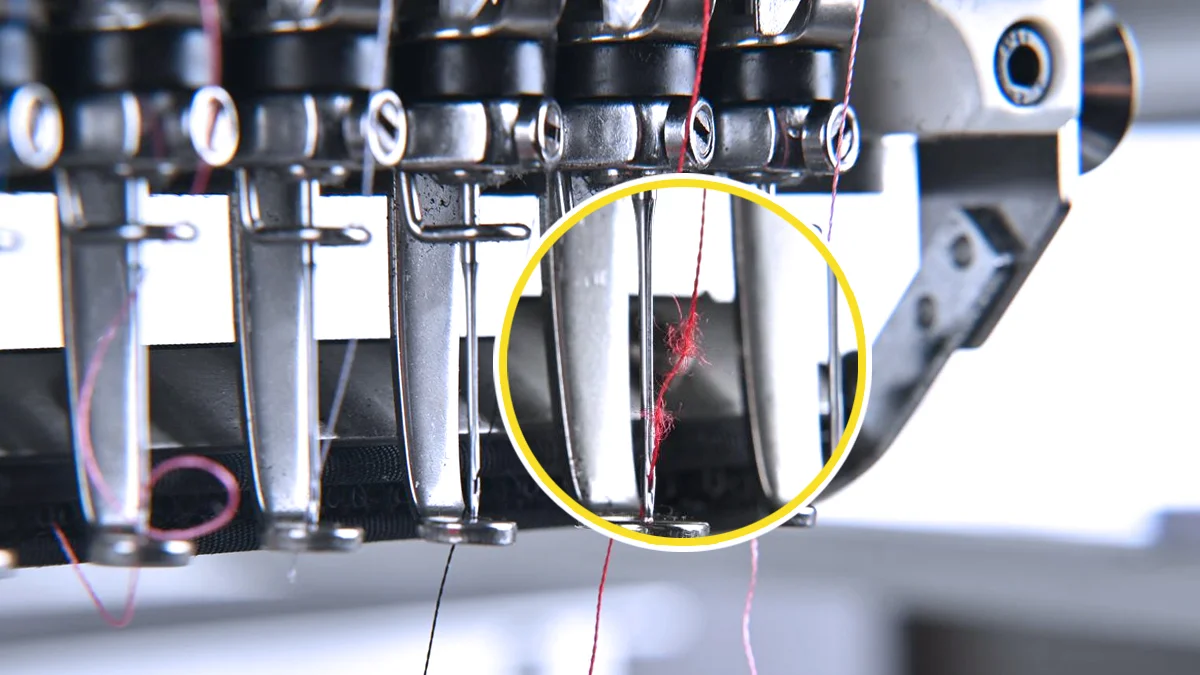
Sometimes, when there is wear or damage to the parts of the embroidery machine, the embroidery thread may encounter obstacles or be compromised, leading to thread breaks. A common issue is the presence of burrs on the machine components. Burrs refer to protrusions or rough areas on the embroidery machine that can catch and pull the embroidery thread, causing it to break.
Besides the previously mentioned needle wear, common machine component wear includes the following situations:
- Needle plate wear: The needle plate is the metal plate on the embroidery machine through which the needle passes. After prolonged use, the surface of the needle plate may become worn or rough. These worn areas can catch the embroidery thread and lead to breaks. Regularly inspect the needle plate, and if you notice any protrusions, roughness, or damage, replace it promptly.
- Other component wear: Apart from the needle and needle plate, other parts of the embroidery machine, such as tension devices and wire connectors, can also experience wear. The wear of these components can result in unstable thread tension or loose wire connections, leading to thread breaks. Regularly inspect and maintain these components to ensure their proper functioning and stability.
Additionally, if the embroidery machine is not regularly cleaned and maintained, dust, fibers, or other debris may accumulate on its components. These debris can cause the formation of burrs and result in the embroidery thread being pulled and damaged, leading to breaks.
e) Improper threading of the machine:
Incorrect threading of the embroidery machine can lead to thread breakage issues. Proper threading is a crucial step to ensure the smooth operation of the embroidery machine and continuous flow of the embroidery thread. If the threading is incorrect, the embroidery thread may encounter obstacles or tension, resulting in breaks. Here are some possible threading errors:
- Incorrect placement of the thread spool: The thread spool is where the embroidery thread is placed. If the thread spool is not correctly placed on the embroidery machine, the embroidery thread cannot smoothly pass through the thread path, making it prone to breakage.
- Incorrect thread path: The thread path is the route the embroidery thread takes from the thread spool to the needle. If the thread path is incorrect, the embroidery thread may get stuck or experience tension, leading to breaks.
- Failure to thread through the needle eye properly: The needle eye is the part of the embroidery needle through which the embroidery thread needs to pass. If the embroidery thread is not threaded through the needle eye correctly, it may get caught or experience tension, resulting in thread breaks.
3. What measures can you take to prevent thread breaks?
Now that we have identified common causes of thread breaks, let's discuss some preventive measures to avoid thread breaks from occurring.
a) Proper tension adjustment
Achieving the correct tension is crucial for preventing thread breaks. It is recommended to start with moderate tension and make small adjustments until you find the optimal tension for a particular project.
Consider the type and thickness of the embroidery thread being used when making adjustments. Different types and thicknesses of thread may have different tension requirements. Fine threads may require looser tension, while thicker threads may require tighter tension. Understand the characteristics of the thread being used and make appropriate tension adjustments based on its properties.
By paying attention to and adjusting the tension, you can reduce the likelihood of thread breaks caused by excessive tension, ensuring the continuity and stability of the embroidery thread.
b) Choosing the correct needle:
Selecting the appropriate needle for your embroidery project is crucial. When choosing an embroidery needle, consider the fabric type, thread thickness, and design complexity. Using the correct needle size can minimize thread friction and tension, thus reducing the likelihood of breaks.
To avoid thread breaks caused by using the wrong needle size, you can take the following measures:
- Choose the appropriate needle size, typically determined based on the thickness of the embroidery thread and the fabric. Finer embroidery threads and fabrics usually require finer needles, while thicker threads and thicker fabrics may require larger needles.
- Conduct tests before embroidering. Try embroidering small samples on the fabric using different needle sizes, and observe how the thread passes through and holds in place. Select the size that provides the best results.
- Ensure the needle tip is smooth and sharp. Dull needles can damage the structure and strength of the embroidery thread, increasing the risk of breaks.
- Pay attention to the angle and force applied when using the embroidery needle. Avoid exerting excessive force or bending the needle tip too much, as this can exert additional tension and pressure on the embroidery thread.
By choosing the appropriate size of embroidery needle, you can prevent thread breaks caused by using the wrong needle. This ensures the stability and continuity of the thread during the embroidery process, helping you achieve better embroidery results.
c) Using high-quality embroidery thread
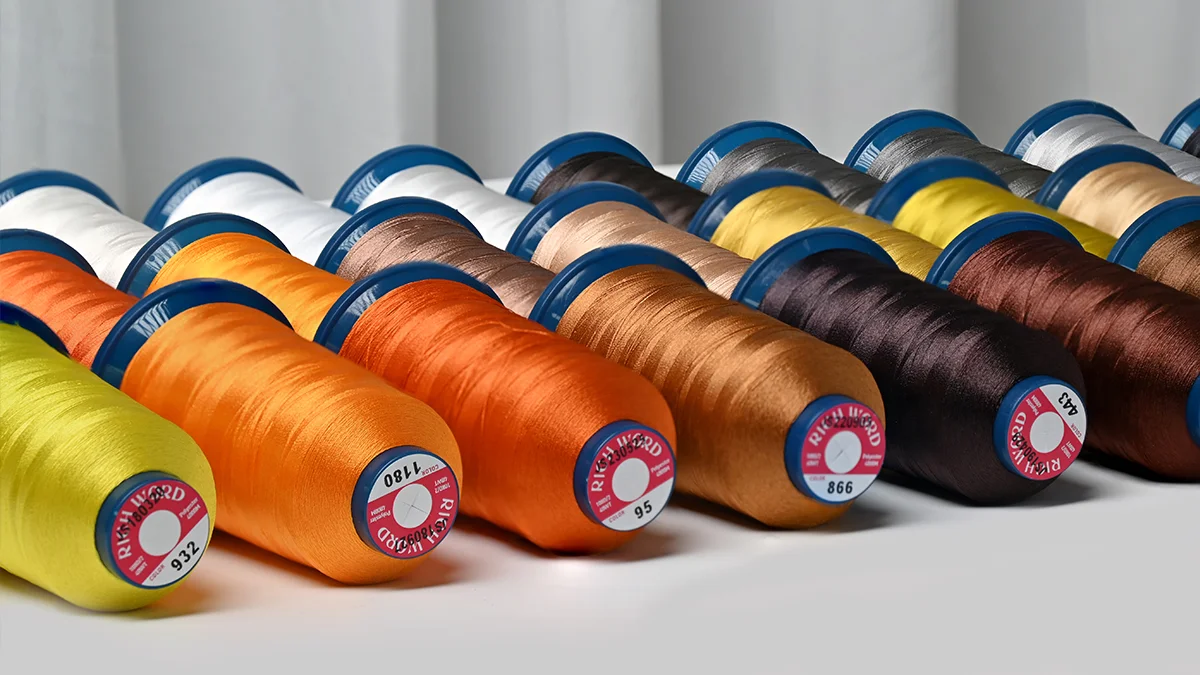
Using high-quality embroidery thread is a wise decision. High-quality thread is more durable, consistent in thickness, and less prone to breakage. When selecting embroidery thread, you should look for reputable brands and consider the specific requirements of your embroidery machine. Here are some measures you can take:
· Choose high-quality embroidery thread: Purchase embroidery thread from reliable brands and suppliers, ensuring its quality and reliability.
· Check the specifications and materials of the thread: Select thread that is suitable for your embroidery project, ensuring its strength and structural stability.
· Inspect the surface of the thread: Ensure that the thread's coating or coloring is even, without any noticeable flaws or rough areas.
· Avoid using old or worn-out embroidery thread: Aging or worn-out thread is more prone to breakage, so it's important to regularly inspect and replace your thread.
· Choose an appropriate storage environment for embroidery thread: Store your thread in a dry, clean environment, avoiding moisture or any other factors that could potentially affect the quality of the thread.
By choosing high-quality embroidery thread, you can reduce the risk of thread breaks and ensure a smoother and more successful embroidery process.
d) Regular machine maintenance
Regular maintenance of your embroidery machine is crucial for preventing thread breaks. Clean the machine regularly, removing any lint or debris, and lubricate moving parts as per the manufacturer's recommendations. This will ensure smooth operation of the machine and reduce the risk of malfunctions that could lead to thread breaks. Here are some specific steps:
- Clean the embroidery machine: Regular cleaning of the embroidery machine is a key step. Use a soft brush to remove dust and debris from the machine.
- Lubricate machine parts: The moving parts of the embroidery machine require proper lubrication to ensure smooth operation. Follow the instructions provided with your embroidery machine to periodically add the appropriate amount of machine oil or lubricant to the essential components.
- Check the needle and needle plate: Regularly inspect the condition of the needle, ensuring that its tip is sharp and free from obvious damage. Also, check the holes on the needle plate to ensure they are clear and free from rust or damage.
By properly maintaining and servicing your embroidery machine, you can reduce the occurrence of thread breaks. Regular cleaning, lubrication, and inspection of machine components contribute to improved performance and continuity of embroidery.
e) Threading correctly
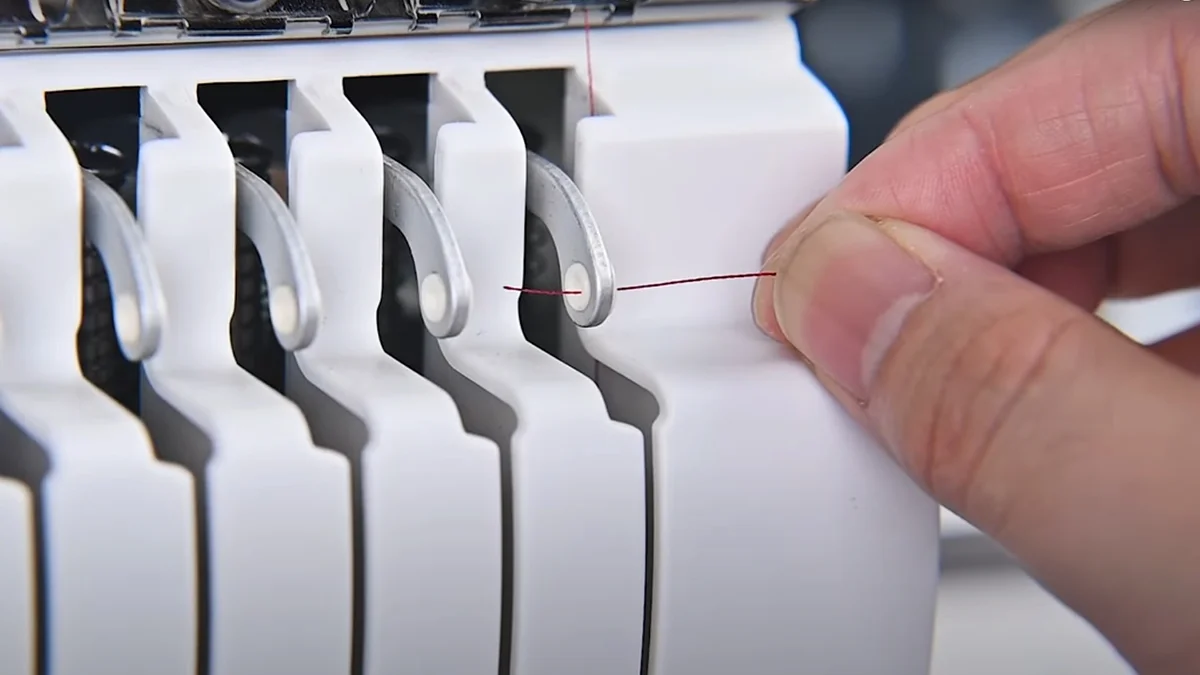
Threading properly before starting embroidery is important. Ensure that the thread passes through the correct tensioning device, thread guides, and needle eye, among other components.
Choose appropriate thread spools, ensuring they fit smoothly on the embroidery machine. Maintain stability in the thread path.
4. What solutions can you implement when thread breaks occur?
After a thread break occurs, you can implement the following solutions:
a) Re-thread the machine
Start by re-threading the machine, ensuring that the thread is correctly guided through all necessary thread paths without any knots. Make sure the thread is securely fixed in the tension disk and threaded properly through the needle. Sometimes, simply re-threading can resolve the issue.
b) Check the needle
Inspect the needle for any signs of damage or wear. Bent or dull needles can cause thread breaks. If necessary, replace the needle and ensure you're using the correct needle size for your embroidery project.
c) Check the bobbin
Ensure that the bobbin is properly inserted and wound with thread. A poorly wound or incorrectly inserted bobbin can lead to thread breaks. Adjust or re-wind the bobbin if necessary.
d) Clean the machine
Use a small brush to remove any lint or debris from the bobbin case, tension disk, and other areas where the thread passes through. Regular cleaning helps maintain the smooth operation of the machine.
e) Adjust the thread tension
If other methods fail, you may need to adjust the thread tension. Make small adjustments to the tension settings, tightening or loosening the tension, and observe how the machine responds. Continuously make small adjustments until you find the optimal tension that prevents thread breaks.
Remember to test the machine after implementing each solution to ensure the issue is resolved and the embroidery can continue uninterrupted.
5. What are some common FAQs about thread breaks?
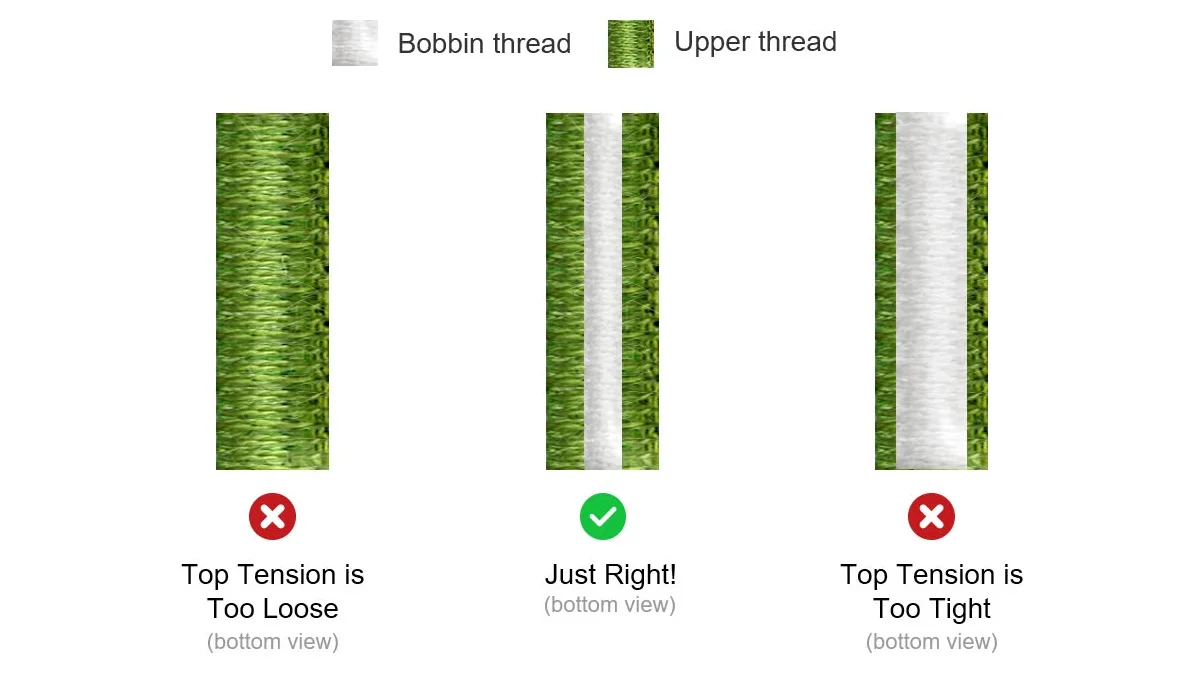
Q1: What's the ideal thread tension for embroidery?
A1: The ideal thread tension for embroidery may vary based on the machine, thread type, and embroidery project. The general guideline is to achieve balanced tension where the top thread and bobbin thread meet in the middle of the fabric.
Q2: How often should I change the embroidery machine needle?
A2: It's recommended to change the needle on your embroidery machine every 8-10 hours of embroidery or whenever you notice signs of wear or damage. Using a new needle ensures smooth stitching and reduces the risk of thread breaks.
Q3: Does using low-quality thread cause thread breaks?
A3: Yes, using low-quality thread increases the chances of thread breaks. Low-quality thread often has inconsistent thickness and strength, making it more prone to breakage. Purchasing high-quality thread will result in better embroidery effects and fewer thread breaks.
Q4: How do I clean my embroidery machine?
A4: To clean your embroidery machine, turn off the machine and unplug it. Use a small brush to remove any lint or debris from the bobbin case, tension disk, and other areas where the thread passes through. Avoid using liquids or solvents unless specified by the manufacturer.
Q5: What should I do if I still have thread breaks after troubleshooting?
A5: If you're still experiencing thread breaks after troubleshooting, feel free to consult our technical support team. They can provide professional guidance and help you resolve any potential issues with your embroidery machine.
In the field of embroidery, thread breaks can be a frustrating obstacle. However, you can minimize their occurrence and achieve perfect embroidery results. Remember to maintain proper thread tension, use the correct needle size, purchase high-quality thread, and regularly maintain your embroidery machine. By following these thread break solutions, we hope you'll overcome thread breaks and create beautiful embroidery designs with ease. Happy embroidering!